Quick and Efficient Dust Bunny Clean-Up- an excerpt from my Photoshop Quick Tips File III
Often times when I am shooting pan blurs or creative blurs I need to use an f/22 or f/29 aperture, however, this can show a lot of dust bunnies on your images. I found that dust bunny clean-up on an image can be time consuming, sloppy and destructive if not done well. The healing brush can leave small pucker-like lines and cloning is often messy. I came up with this method after hours and hours of trial and error. I feel this technique works best especially when you have a lot clean-up to do.
First bring your image into Photoshop, duplicate the layer Cmd or Ctrl J, then go to Filter> Noise> Dust & Scratches, when the dialogue box opens apply (14) pixels to the Radius and on Threshold (1) to the level, see screen capture # 3 below.
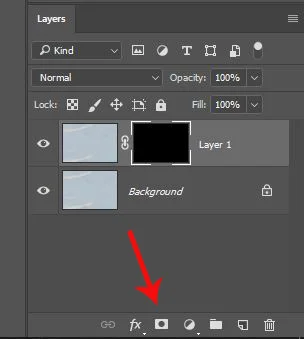
Once you hit OK, the effect will be your top layer, next add an Inverse Layer mask (an inverse layer mask aka as a hide-all mask is created by holding down the Alt/Option key while pressing on the mask icon at the same time) see screen capture # 4 below.
After your inverse layer mask is set up, select a soft bush at 100% opacity, set to paint with white and brush over only the dust bunnies in the image-it will look like you are erasing them if you are doing it correctly.
*Note if you have just a plain blue sky with no objects or clouds you may not need to use a mask to selectively apply the effect. Also, sometimes these values need to be adjusted but make very small adjustments to this recipe.
#1 Original Image
#2 Close-up of the left top corner of the image-showing all of the dust bunnies
#3 Dust & Scratches Dialogue box
#4 Inverse Layer mask/ hide all mask should look like this. Red arrow pointing to the mask icon.
#5 Final image after using a layer mask to selectively paint the effect only on the dust bunnies.


